2. 스마트 컨트랙트
2.1 스마트 컨트랙트 이해하기
지금부터는 EOS 스마트 컨트랙트 개발의 기본적인 기능과 구조를 알아봅니다. 로컬 노드에서 주요 명령어도 실습해 봅니다.
2.2 스마트 컨트랙트 배포 계정 생성하기
로컬 노드로 블록을 생성했다면 스마트 컨트랙트 개발 준비가 거의 끝나갑니다. 남은 일은 스마트 컨트랙트를 배포할 계정 생성입니다.
EOS는 계정당 1개의 스마트 컨트랙트만 배포할 수 있습니다. 배포한 스마트 컨트랙트의 크기에 비례하여 EOS가 소모됩니다. 따라서 지갑이 연결된 계정이 반드시 필요합니다.
코딩 환경 구성
EOS는 리눅스에서 vim으로 개발이 가능한데, GUI 환경에 익숙한 분이 사용하기에는 아무래도 불편합니다. CUI(Character User Interface)에 익숙치 않다면 GUI 환경에서 EOS 스마트 컨트랙트를 개발할 수도 있습니다.
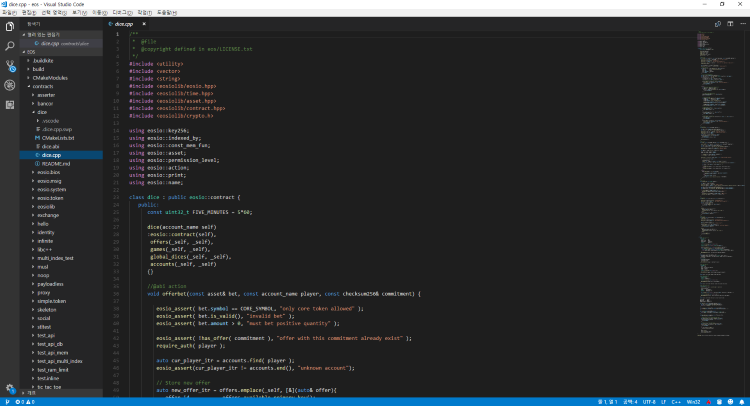
많은 개발자에게 친숙한 마이크로소프트의 비주얼 스튜디오 코드(Visual Studio Code)로 개발하는 것입니다. 비주얼 스튜디오 코드는 리눅스뿐 아니라 다양한 언어를 지원하며 사용하기도 편한 통합개발 환경(IDE)입니다. 비주얼 스튜디오 코드를 이용해 EOS 스마트 컨트랙트를 개발하고 실행할 수 있습니다.
비주얼 스튜디오 코드는 마이크로소프트 홈페이지(https://code.visualstudio.com/)에서 무료로 내려받을 수 있습니다. 비주얼 스튜디오 코드 사용법은 https://code.visualstudio.com/docs에서 확인할 수 있습니다.
< Visual Code download 페이지 >
윈도 10에 우분투를 설치한 경우 리눅스 설치 경로는 사용자마다 조금씩 다르지만, 일반적인 위치는 다음과 같습니다.
```
C:\Users\Home\AppData\Local\Packages\CanonicalGroupLimited.Ubuntu18.04onWindows_79rhkp1fndgsc\LocalState\rootfs\home

```
지갑 생성하기
EOS는 계정과 지갑Wallet이 따로 분리되어 있습니다. Owner Key와 Active Key를 가진 지갑을 생성하고, 이 지갑을 이용하여 계정을 생성해야 합니다.
먼저 자신의 지갑을 확인해 보겠습니다.
```
$ cleos wallet list

```
< 지갑 확인하는 화면 >
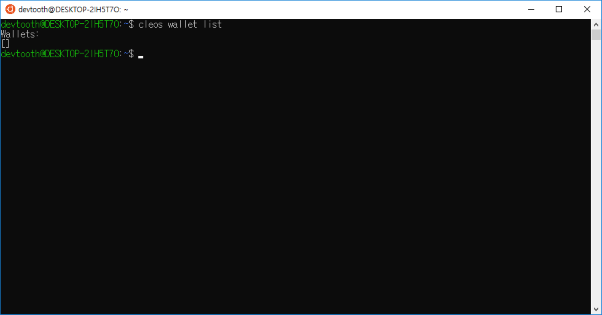
```
devtooth@DESKTOP-2 :~$ cleos wallet list
Wallets :
[ ]
devtooth@DESKTOP-2 :~$

```
생성한 지갑이 없기 때문에 Wallet List가 공백입니다. 지갑은 다음 명령어로 생성할 수 있습니다.
```
$ cleos wallet create

```
명령어 뒤에 -n [지갑 이름]을 추가하면 지갑의 이름을 지정할 수도 있습니다. 자, 다음 명령어로 지갑을 생성해 봅시니다.
```
$ cleos wallet create -n [지갑이름]

```
지갑의 이름을 설정하지 않으면 기본 설정인 default로 지갑이 생성됩니다. 만약 Either indicate a file using "--file" or pass "--to-console" 에러가 뜬다면 --to-console을 추가하면 해결됩니다.
< 지갑 생성 화면 >
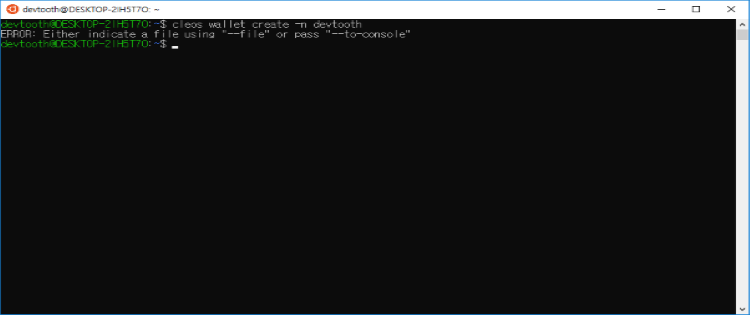
```
devtooth@DESKTOP-2 :~$ cleos wallet create -n devtooth
ERROR: Either indicate a file using "--file" or pass "--to-console"
devtooth@DESKTOP-2 :~$

```
지갑이 생성됐습니다. 다음 명령어로 지갑을 확인합니다.
```
$ cleos wallet list

```
< 지갑 리스트 화면 >
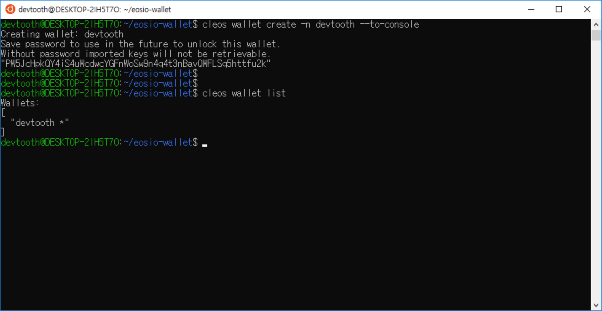
```
devtooth@DESKTOP-2 :~/eosio-wallet$ cleos wallet create -n devtooth --to-console
Creating wallet: devtooth
Save password to use in the future to unlock this wallet.
Without password imported keys will not be retrievable.
"PW5JcHpkQY4iS4uKcdwcYGFnWoSw9n4q4t3nBavQWFLSq5httfu2k"
devtooth@DESKTOP-2 :~/eosio-wallet$
devtooth@DESKTOP-2 :~/eosio-wallet$
devtooth@DESKTOP-2 :~/eosio-wallet$ cleos wallet list
Wallets:
[
  "devtooth *"
]
devtooth@DESKTOP-2 :~/eosio-wallet$

```
지갑이 생성되면 Master Key를 알려줍니다. 해당 Key는 지갑을 Unlock하는 데 필요하므로 잘 보관해야 합니다. 때때로 재시작 이후 Wallet List가 비어 있기도 합니다. 이 경우 다음 명령어로 지갑을 불러올 수 있습니다.
```
$ cleos wallet open -n [지갑 이름]

```
< 지갑이 비어있을 경우 불러오는 화면 >
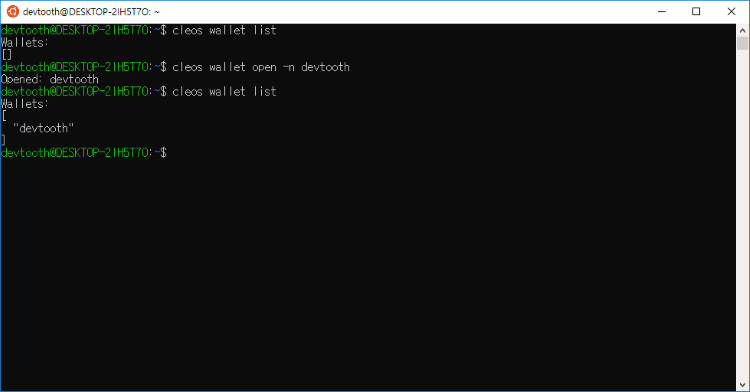
```
devtooth@DESKTOP-2 :~$ cleos wallet list
Wallets:
[ ]
devtooth@DESKTOP-2 :~$ cleos wallet open -n devtooth
Opened: devtooth
devtooth@DESKTOP-2 :~$ cleos wallet list
Wallets:
[
  "devtooth"
]
devtooth@DESKTOP-2 :~$

```
지갑을 불러오면 기본적으로 Lock이 되어 있습니다. 지갑을 사용하려면 상태를 Unlock으로 변경해야 합니다. Unlock은 다음 명령어로 할 수 있습니다.
```
$ cleos wallet unlock -n [지갑이름] --password [Mater Key]

```
< 지갑을 Unlock 화면 >
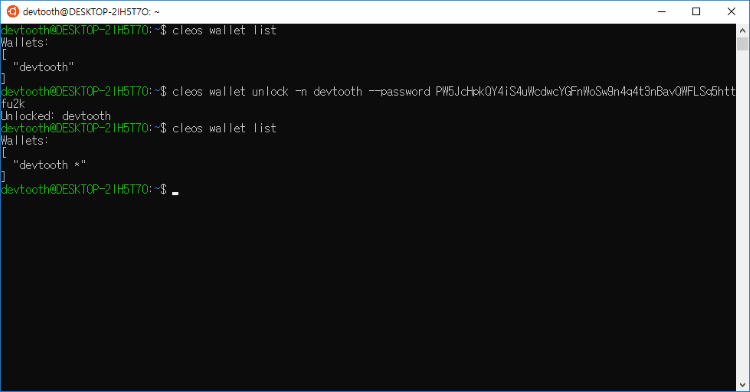
```
devtooth@DESKTOP-2 :~$ cleos wallet list
Wallets:
[
  "devtooth"
]
devtooth@DESKTOP-2 :~$ cleos wallet unlock -n devtooth --password PW5JcHpkQY4iS4uKcdwcYGFnWoSw9n4q4t3nBavQWFLSq5httfu2k
Unlocked: devtooth
devtooth@DESKTOP-2 :~$ cleos wallet list
Wallets:
[
  "devtooth *"
]
devtooth@DESKTOP-2 :~$

```
Unlock 상태인 지갑은 지갑 이름 옆에 *이 붙어 있습니다. Unlock 상태는 기본적으로 900초간 유지되다가 Lock 상태로 변경됩니다. 이 시간은 eosio-wallet 폴더의 config.ini 파일에서 설정할 수 있습니다.
< 지갑 Lock 상태 시간 변경 화면 >
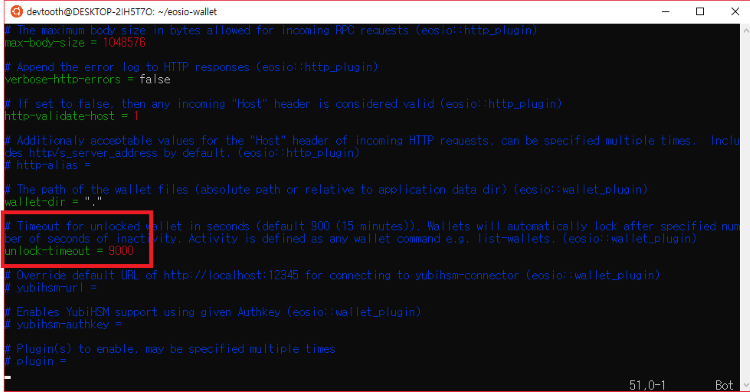
```
# The maximum body size in bytes allowed for incoming RPC requests (eosio::http_plugin)
max-body-size = 1048576

# Append the error log to HTTP responses (eosio::http_plugin)
verbose-http-errors = false

# If set to false, then any incoming "Host" header is considered valid (eosio::http_plugin)
http-validate-host = 1

# Additionaly acceptable values for the "Host" header of incoming HTTP requests, can be specified multiple times.  Inclu
des http/s_server_address by default. (eosio::http_plugin)
# http-alias =

# The path of the wallet files (absolute path or relative to application data dir) (eosio::wallet_plugin)
wallet-dir = "."

# Timeout for unlocked wallet in seconds (default 900 (15 minutes)). Wallets will automatically lock after specified num
ber of seconds of inactivity. Activity is defined as any wallet command e.g. list-wallets. (eosio::wallet_plugin)
unlock-timeout = 9000

# Override default URL of http://localhost:12345 for connecting to yubihsm-connector (eosio::wallet_plugin)
# yubihsm-url =

# Enables YubiHSM support using given Authkey (eosio::wallet_plugin)
# yubihsm-authkey =

```
Wallet Key 생성 및 연결
생성한 지갑은 EOS 블록체인 상에 올라가 있지 않습니다. 단지 Keosd로 만들어진 하드웨어 지갑입니다. 이 지갑과 계정을 연결하고 체인에 올리려면 지갑에 Key를 임포트(Import)시켜야 합니다. 이 Key를 통해 해당 계정의 소유자임을 블록체인 상에서 증명할 수 있습니다.
계정에 연결되는 Key는 Owner Key, Active Key 총 2개입니다. 각 Key는 특정 권한을 가집니다. Owner Key는 계정에 대한 루트 액세스 권한을 가집니다. Owner Key의 Private Key를 소유한 사용자는 모든 계정에 대한 권한 변경 등을 할 수 있습니다. 때문에 해당 Key는 다른 사람과 공유해서는 안 됩니다. Active Key는 Owner Key에 비해 권한이 제한적입니다. 자금의 이체, 블록 프로듀서(Block Producer : BP) 투표 등에 사용됩니다.
Key는 다음 명령어로 생성합니다.
```
$ cleos create key --to-console

```
명령어를 입력하면 Private Key와 Public Key 한 쌍이 생성됩니다.
< Private, Public key 생성하는 화면 >
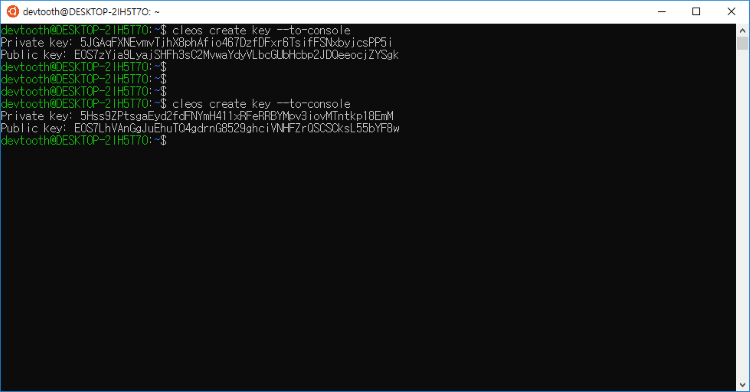
```
devtooth@DESKTOP-2 :~$ cleos create key --to-console
Private key: 5JGAqFXNEvmvTjhX8phAfio467DzfDFxr6TsifFSNxbyjcsPP5i
public key: EOS7zYja9LyajSHFh3sC2MvwaYdyVLbcGUbHcbp2JDQeeocjZYSgk
devtooth@DESKTOP-2 :~$
devtooth@DESKTOP-2 :~$
devtooth@DESKTOP-2 :~$
devtooth@DESKTOP-2 :~$ cleos crate key --to-console
private key: 5Hss9ZPtsgaEyd2fdFNYmH411xRFeRRBYMpv3iovMTntkp18EmM
public key: EOS7LhVAnGgJuEhuTQ4gdrnG8529ghciVNHFZrQSCSCksL55bYF8w
devtooth@DESKTOP-2 :~$

```
이 한쌍의 Key가 Owner Key, Active Key 각각에 들어가야 하므로 총 2쌍의 키(Owner Key, Active Key)가 생성됩니다. 이 Key는 스캐터(Scatter)등을 연결하는 데 필요하므로 따로 저장해야 합니다.
생성한 키를 다음 명령어로 지갑에 임포트해 봅시다. Owner Key와 Active Key 2개를 지갑에 임포트합니다.
```
$ cleos wallet import -n [지갑이름]

```
< owner, Active Key를 지갑에 입력하는 화면 >
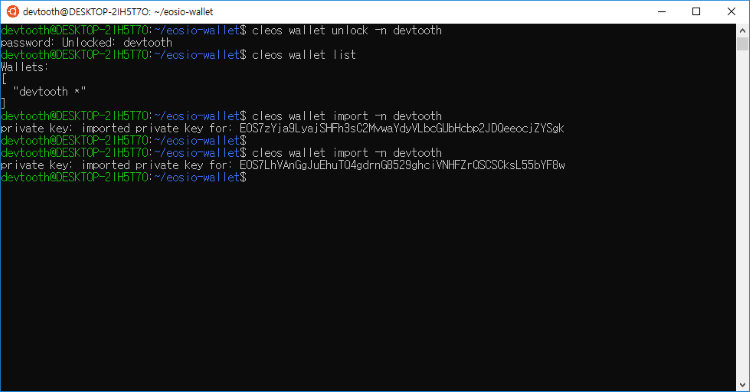
```
devtooth@DESKTOP-2 :~/eosio-wallet$ cleos wallet unlock -n devtooth
password: Unlocked : devtooth
devtooth@DESKTOP-2 :~/eosio-wallet$ cleos wallet list
Wallets:
[
  "devtooth *"
]
devtooth@DESKTOP-2 :~/eosio-wallet$ cleos wallet import -n devtooth
private key: imported private key for: EOS7zYja9LyajSHFh3sC2MvwaYdyVLbcGUbHcbp2JDQeeocjZYSgk
devtooth@DESKTOP-2 :~/eosio-wallet$
devtooth@DESKTOP-2 :~/eosio-wallet$ cleos wallet import -n devtooth
private key: imported private key for: EOS7LhVAnGgJuEhuTQ4gdrnG8529ghciVNHFZrQSCSCksL55bYF8w
devtooth@DESKTOP-2 :~/eosio-wallet$

```
Key 2개를 임포트한 다음, 마지막으로 EOS.IO의 Key도 임포트합니다. EOS는 계정을 소유한 생산자가 다른 사용자에게 계정을 만들어주는 방식으로 계정을 생성합니다. 때문에 계정을 생성하기 위해서는 새로운 사용자의 Owner Key, Active Key뿐 아니라 생성자의 Private Key를 이용한 퍼미션(Permission)도 필요합니다. 현재 작업하고 있는 로컬 블록에서는 EOS.IO 계정이 생성자이므로, EOS.IO의 Key를 임포트합니다.
EOS.IO 버전 1의 Private Key는 다음과 같습니다.
- Private Key : 5KQwrPbwdL6PhXujxW37FSSQZ1JiwsST4cqQzDeyXtP79zkvFD3
이 키는 EOS.IO 자체가 포함하는 Key입니다. 해당 Key의 정보는 config.ini의 signature-provider에서 확인할 수 있습니다.
```
/home/[계정폴더]/.local/share/eosio/nodeos/config/config.ini

```
signature-provider 탭을 보시면 EOS.IO Key의 Public Key와 Private Key가 순서대로 입력되어 있는 것을 확인할 수 있습니다.
< public, private key가 입력된 화면 >
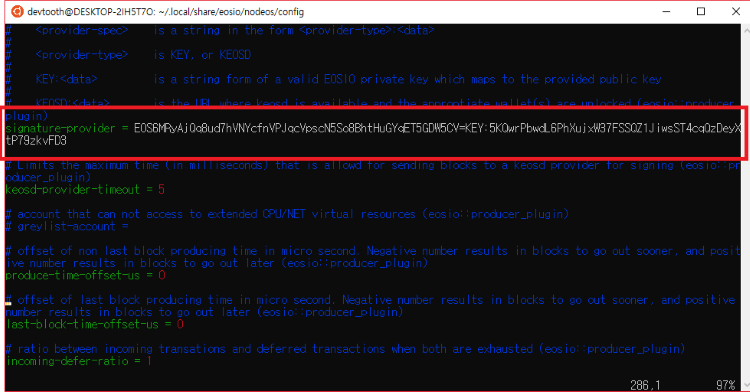
``` #is KEY, or KEOSD # # KEY: is a string form of a valid EOSIO private key which maps to the provided public key # # KEOSD: is the URL where keosd is available and the approptiate wallet(s) are unlocked (eosio::producer_plugin) signature-provider = EOS6MRyAjQq8ud7hVNYcfnVPJqcVpscN5So8BhtHuGYqET5GDW5CV=KEY:5KQwrPbwdL6PhXujxW37FSSQZ1JiwsST4cqQzDeyX tP79zkvFD3 # Limits the maximum time (in milliseconds) that is allowd for sending blocks to a keosd provider for signing (eosio::producer_plugin) keosd-provider-timeout = 5 ```
총 3개의 Key를 자신의 지갑에 임포트했습니다. 잘 임포트됐는지 다음 명령어로 확인합니다.
```
$ cleos wallet keys

```
지갑에 Owner, Active, EOS.IO 총 3개의 키가 등록됐습니다. 이제 계정을 만들 준비가 되었습니다.
< 자신의 지갑 3개의 key 목록 화면 >
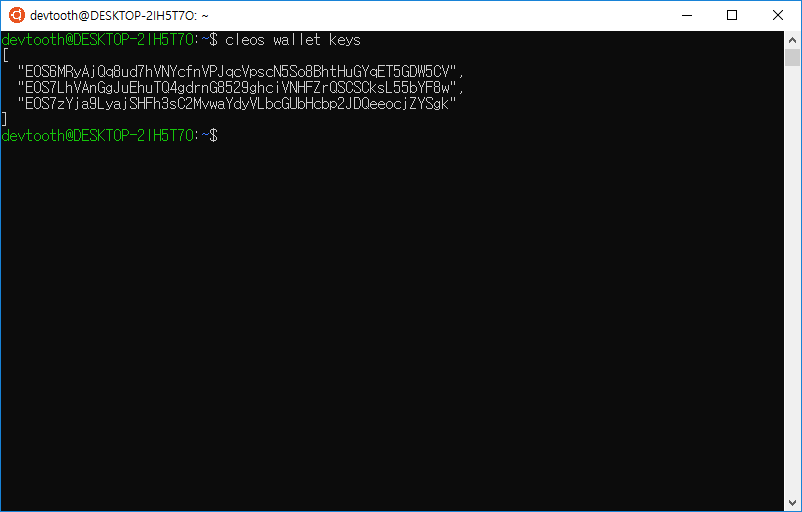
```
devtooth@DESKTOP-2 :~$ cleos wallet keys
[
  "EOS6MRyAjQq8ud7hVNycfnVPJqcVpscN5So8BhtHuGYqET5GDW5CV",
  "EOS7LhVAnGgJuEhuTQ4gdrnG8529ghciVNHFZrQSCSCksL55bYF8w",
  "EOS7zYja9LyajSHFh3sC2MvwaYdyVLbcGUbHcbp2JDQeeocjZYSgk"
]
devtooth@DESKTOP-2 :~$

```
Account 생성
먼저 기존에 작업하던 셸을 두고, 다른 우분투 셸을 하나 엽니다. 새로운 셸에서 로컬 블록체인 네트워크를 활성화한 후 다음 명령어로 계정을 생성합니다.
```
$ cleos create account [Create_Account] [New_Account] [public_OwnerKey] [public_ActiveKey]

```
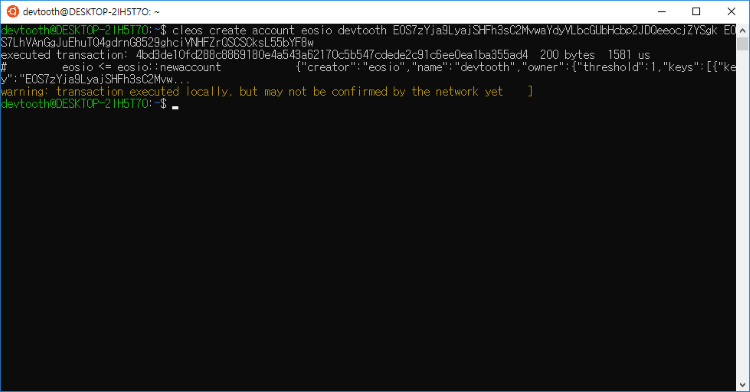
다음 그림과 같이 계정이 생성될 것입니다.
< 계정 생성 성공시 화면 >
```
devtooth@DESKTOP-2 :~$ cleos create account eosio devtooth
EOS7zYja9LyajSHFh3sC2MvwaYdyVLbcGUbHcbp2JDQeeocjZYSgk
EOS7LhVAnGgJuEhuTQ4gdrnG8529ghciVNHFZrQSCSCksL55bYF8w
executed transaction:
4bd3de10fd288c8869180e5a543a62170c5b547cdede2c91c6ee0ea1ba355ad4 200 bytes 1581 us
#	eosio <= eosio::newaccount		{"creator":"eosio":"name":"devtooth","owner":{"threshold":1,"keys":[{key":"EOS7zYja9LyajSHFh3sC2Mvw...
warning: transaction executed locally, but may not be confirmed by the network yet ]
devtooth@DESKTOP-2 :~$

```
계정이 생성되면 다음 명령어로 계정 정보를 확인해 봅시다.
```
$ cleos get account 계정명

```
< 계정 정보 확인 화면 >

```
devtooth@DESKTOP-2 :~$ cleos get account devtooth
permissions:
   owner	1:	1 EOS7zYja9LyajSHFh3sC2MvwaYdyVLbcGUbHcbp2JDQeeocjZYSgk
     active   1:	   1 EOS7LhVAnGgJuEhuTQ4gdrnG8529ghciVNHFZrQSCSCksL55bYF8w
memory:
	quota:	unlimited used:	2.66 KiB
net bandwidth:
	used:	          unlimited
	available:	 unlimited
	limit:	          unlimited
cpu bandwidth:
	used:	          unlimited
	available:	 unlimited
	limit:	          unlimited

devtooth@DESKTOP-2 :~$

```
로컬 노드에 스마트 컨트랙트 배포
EOS 메인넷에서 스마트 컨트랙트를 배포하기 위해서는 스마트 컨트랙트를 생성할 계정, WAST 파일 크기 4배 이상의 RAM, 그리고 트랜잭션을 실행하기에 충분한 CPU가 필요합니다. 앞서 생성한 계정을 이용해 EOS에서 제공하는 스마트 컨트랙트 기본 예제를 로컬 블록체인으로 배포해 봅시다.
EOS 스마트 컨트랙트 예제는 다음 경로에 위치합니다.
```
../eos/build/contracts/

```
< 스마트 컨트랙트 예제 목록 화면 >
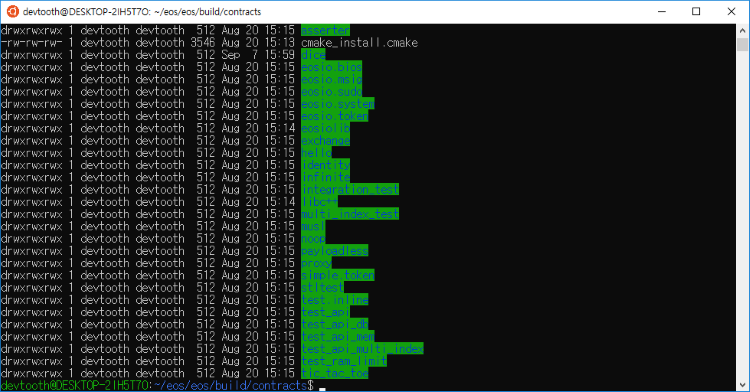
```
-rw-rw-rw- 1 owen owen 6934 Dec  3 17:23 Makefile
drwxrwxrwx 1 owen owen  512 Dec 11 15:35 asserter/
-rw-rw-rw- 1 owen owen 3362 Dec  3 17:23 cmake_install.cmake
drwxrwxrwx 1 owen owen  512 Dec 11 15:35 eosio.bios/
drwxrwxrwx 1 owen owen  512 Dec 11 15:35 eosio.msig/
drwxrwxrwx 1 owen owen  512 Dec 11 15:35 eosio.sudo/
drwxrwxrwx 1 owen owen  512 Dec 11 15:35 eosio.system/
drwxrwxrwx 1 devtooth devtooth 512 Dec 11 15:35 eosio.token/
drwxrwxrwx 1 devtooth devtooth  512 Dec 11 15:35 eosiolib/
drwxrwxrwx 1 devtooth devtooth  512 Dec 11 15:35 hello/
drwxrwxrwx 1 devtooth devtooth  512 Dec 11 15:35 identity/
drwxrwxrwx 1 devtooth devtooth  512 Dec 11 15:35 infinite/
drwxrwxrwx 1 devtooth devtooth  512 Dec 11 15:35 integration_test/
drwxrwxrwx 1 devtooth devtooth  512 Dec 11 15:35 libc++/
drwxrwxrwx 1 devtooth devtooth  512 Dec 11 15:35 multi_index_test/
drwxrwxrwx 1 devtooth devtooth  512 Dec 11 15:35 musl/
drwxrwxrwx 1 devtooth devtooth  512 Dec 11 15:35 noop/
drwxrwxrwx 1 devtooth devtooth  512 Dec 11 15:35 payloadless/
drwxrwxrwx 1 devtooth devtooth  512 Dec 11 15:35 proxy/
drwxrwxrwx 1 devtooth devtooth  512 Dec 11 15:35 simple.token/
drwxrwxrwx 1 devtooth devtooth  512 Dec 11 15:35 snapshot_test/
drwxrwxrwx 1 devtooth devtooth  512 Dec 11 15:35 stltest/
drwxrwxrwx 1 devtooth devtooth  512 Dec 11 15:35 test.inline/
drwxrwxrwx 1 devtooth devtooth  512 Dec 11 15:35 test_api/
drwxrwxrwx 1 devtooth devtooth  512 Dec 11 15:35 test_api_db/
drwxrwxrwx 1 devtooth devtooth  512 Dec 11 15:35 test_api_mem/
drwxrwxrwx 1 devtooth devtooth  512 Dec 11 15:35 test_api_multi_index/
drwxrwxrwx 1 devtooth devtooth  512 Dec 11 15:35 test_ram_limit/
drwxrwxrwx 1 devtooth devtooth  512 Dec 11 15:35 tic_tac_toe/
devtooth@DESKTOP-2 :~$

```
이중 Hello 프로젝트 폴더의 파일을 살펴보겠습니다.
< Hello Project 디렉토리 내의 목록 화면 >
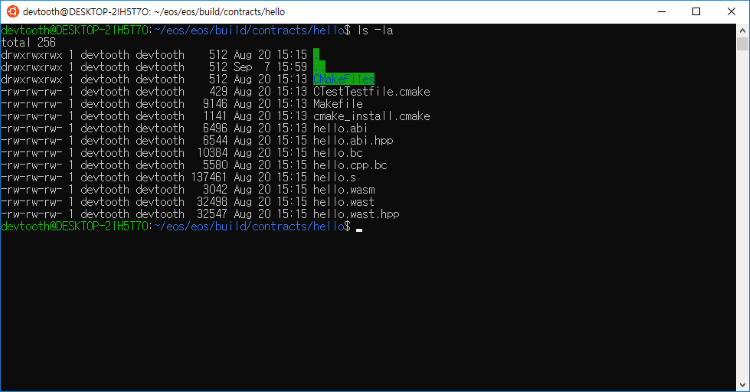
```
owen@DESKTOP-2:~/eos/eos/build/contracts/hello$ ls -la
total 256
drwxrwxrwx 1 devtooth devtooth    512 Dec 11 15:35 .
drwxrwxrwx 1 devtooth devtooth    512 Dec 11 15:35 ..
drwxrwxrwx 1 devtooth devtooth   512 Dec 11 15:35 CMakeFiles
-rw-rw-rw- 1 devtooth devtooth    413 Dec  3 17:23 CTestTestfile.cmake
-rw-rw-rw- 1 devtooth devtooth   8245 Dec  3 17:23 Makefile
-rw-rw-rw- 1 devtooth devtooth   1137 Dec  3 17:23 cmake_install.cmake
-rw-rw-rw- 1 devtooth devtooth   6496 Dec  3 17:23 hello.abi
-rw-rw-rw- 1 devtooth devtooth   6544 Dec  3 17:27 hello.abi.hpp
-rw-rw-rw- 1 devtooth devtooth  10384 Dec  3 17:27 hello.bc
-rw-rw-rw- 1 devtooth devtooth   5576 Dec  3 17:27 hello.cpp.bc
-rw-rw-rw- 1 devtooth devtooth 137461 Dec  3 17:27 hello.s
-rw-rw-rw- 1 devtooth devtooth   3042 Dec  3 17:27 hello.wasm
-rw-rw-rw- 1 devtooth devtooth  32498 Dec  3 17:27 hello.wast
-rw-rw-rw- 1 devtooth devtooth  32547 Dec  3 17:27 hello.wast.hpp
devtooth@DESKTOP-2:~/eos/eos/build/contracts/hello$

```
폴더 내부에는 hello.abi, hello.wasm 등의 파일이 있습니다. 소스 코드를 eosiocpp 컴파일러로 빌드하면 .wasm 파일과 .abi 파일이 생성되며, 이 두 파일로 스마트 컨트랙트를 배포합니다. 이 장에서는 해당 파일을 배포하는 방법만 다루겠습니다. 다음의 명령어를 입력하면 스마트 컨트랙트가 배포됩니다.
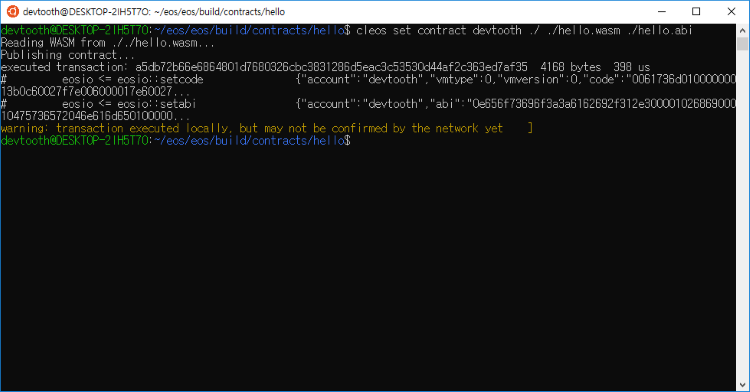
```
$ cleos set contract [계정 이름] [배포 경로] [.wasm 파일 경로] [.abi 파일 경로]
$ cleos set contract devtooth ./ ./hello.wasm ./hello.abi

```
이더리움의 경우 하나의 계정으로 여러 스마트 컨트랙트를 배포할 수 있지만, EOS는 계정당 하나의 스마트 컨트랙트만 배포 가능합니다. 스마트 컨트랙트 주소가 배포하는 계정명이 되는 것입니다. 참고로 wasm과 abi가 같은 폴더에 있는 경우 파일 경로로 ./폴더명을 입력하면 한번에 wasm 파일과 abi 파일을 지정할 수 있습니다.
< 스마트 컨트랙트 배포 화면 >
```
devtooth@DESKTOP-2 :~/eos/eos/build/contracts/hello$ cleos set contract devtooth ./ ./hello.wasm ./hello.abi
Reading WASM from ././hello.wasm. . .
Publishing contract. . .
executed transaction:
 a5db72b66e6864801d7680326cbc3831286d5eac3c53530d44af2c363ed7af35   4168 bytes  398 us
#	eosio <= eosio::setcode		{"account":"devtooth","vmtype":0,"vmversion":0,"code":
"0061736d010000000013b0c60027f7e006000017e60027. . .
#	eosio <= eosio::setabi		{"account":"devtooth","abi":
"0e656f73696f3a3a6162692f312e300001026869000100475736572046e616d650100000. . .
warning: transaction executed locally, but may not be confirmed by the network yet	]
devtooth@DESKTOP-2 :~/eos/eos/build/contracts/hello$

```
스마트 컨트랙트를 성공적으로 배포를 하면 트랜잭션이 실행되고 그 결과가 출력됩니다. 이번에는 폴더명을 통일해 배포해 봅시다. Dice 프로젝트 폴더로 이동합니다. 다음은 Dice 프로젝트 폴더의 파일입니다.
< Dice 프로젝트 폴더의 파일 >
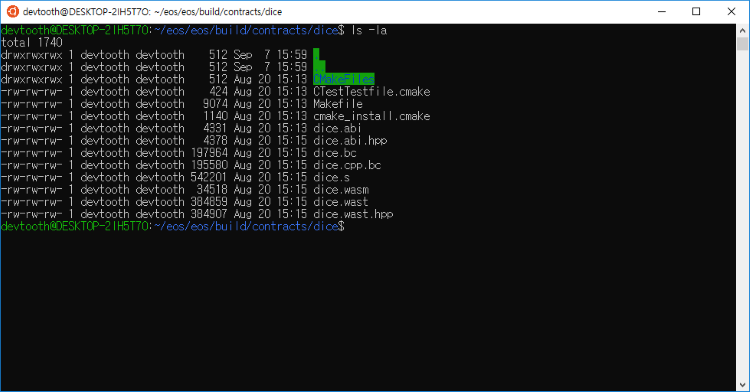
```
devtooth@DESKTOP-2 :~/eos/eos/build/contracts/dice$ ls -la
total 1740
drwxrwxrwx 1 devtooth devtooth      512 Sep  7 15:59 .
drwxrwxrwx 1 devtooth devtooth      512 Sep  7 15:59 ..
drwxrwxrwx 1 devtooth devtooth      512 Aug 20 15:53 CMakeFiles
-rw-rw-rw- 1 devtooth devtooth      424 Aug 20 15:53 CTestTestfile.cmake
-rw-rw-rw- 1 devtooth devtooth     9074 Aug 20 15:53 Makefile
-rw-rw-rw- 1 devtooth devtooth     1140 Aug 20 15:53 cmake_install.cmake
-rw-rw-rw- 1 devtooth devtooth     4331 Aug 20 15:55 dice.abi
-rw-rw-rw- 1 devtooth devtooth     4378 Aug 20 15:55 dice.abi.hpp
-rw-rw-rw- 1 devtooth devtooth  197964 Aug 20 15:55 dice.bc
-rw-rw-rw- 1 devtooth devtooth  195580 Aug 20 15:55 dice.cpp.bc
-rw-rw-rw- 1 devtooth devtooth  542201 Aug 20 15:55 dice.s
-rw-rw-rw- 1 devtooth devtooth   34518 Aug 20 15:55 dice.wasm
-rw-rw-rw- 1 devtooth devtooth 384859 Aug 20 15:55 dice.wast
-rw-rw-rw- 1 devtooth devtooth 384907 Aug 20 15:55 dice.wast.hpp
devtooth@DESKTOP-2 :~/eos/eos/build/contracts/dice$

```
폴더명과 이름이 같은 dice.wasm, dice.abi 파일이 있습니다. 이런 경우 다음과 같이 스마트 컨트랙트를 배포할 수 있습니다
```
$ cleos set contract [계정 이름] [배포할 경로]
$ cleos set contract devtooth ../dice

```
< dice 경로로 파일의 경로를 합쳐서 배포한 화면 >
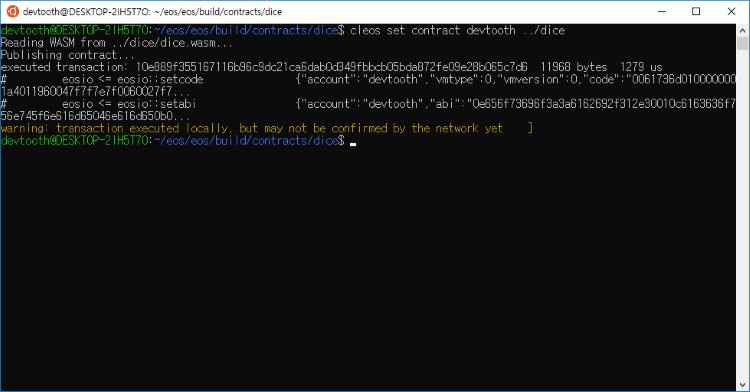
```
devtooth@DESKTOP-2 :~/eos/eos/build/contracts/dice$ cleos set contract devtooth ../dice
Reading WASM from ../dice/dice.wasm. . .
Publishing contract. . .
executed transaction:
10e889f355167116b96c9dc21ca6dab0d349fbbcb05bda872fe09e28b065c7d6
11968 bytes   1279 us
#	eosio <= eosio::setcode		{"account":"devtooth","vmtype":0,"vmversion:"0,"code":"0061736d01000000001a4011960047f7f7e7f0060027f7. . .
#	eosio <=	eosio::stabi		{"account":"devtooth","abi":"0e656f73696f3a3a6162692f312e30010c6163636f756e745f6e616d65046e616d650b0. . .
warning: transaction executed locally, but may not be confirmed by the network yet	]
devtooth@DESKTOP-2 :~/eos/eos/build/contracts/dice$

```