8. 북극곰 탈출 게임
지난번 연재 8-1, 8-2와 이어집니다.
8.4. 시작화면 만들기
8.4.1. 시작화면 UI 구성하기
StartScene이라는 이름의 클래스를 Classes 폴더에 생성합니다. [5.2] 참고.

Figure 14 클래스 생성
생성된 StartScene.h파일과 StartScene.cpp를 아래와 같이 수정합니다.
----------StartScene.h----------
#include "cocos2d.h"
class StartScene : public cocos2d::Layer
{
public:
// there's no 'id' in cpp, so we recommend returning the class instance pointer
static cocos2d::Scene* createScene();
// Here's a difference. Method 'init' in cocos2d-x returns bool, instead of returning 'id' in cocos2d-iphone
virtual bool init();
// implement the "static create()" method manually
CREATE_FUNC(StartScene);
};
----------StartScene.cpp----------
#include "StartScene.h"
USING_NS_CC;
Scene* StartScene::createScene()
{
// 'scene' is an autorelease object
auto scene = Scene::create();
// 'layer' is an autorelease object
auto layer = StartScene::create();
// add layer as a child to scene
scene->addChild(layer);
// return the scene
return scene;
}
// on "init" you need to initialize your instance
bool StartScene::init()
{
//////////////////////////////
// 1. super init first
if (!Layer::init())
{
return false;
}
//code here
return true;
}
AppDelegate.cpp에서 StartScene.cpp파일을 호출하도록 수정합니다.
----------Appdelegate.cpp----------
#include "AppDelegate.h"
#include "StartScene.h"
USING_NS_CC;
…생략…
bool AppDelegate::applicationDidFinishLaunching() {
// initialize director
auto director = Director::getInstance();
auto glview = director->getOpenGLView();
if(!glview) {
glview = GLViewImpl::createWithRect("My Game", Rect(0, 0, designResolutionSize.width, designResolutionSize.height));
director->setOpenGLView(glview);
}
glview->setDesignResolutionSize(designResolutionSize.width, designResolutionSize.height, ResolutionPolicy::SHOW_ALL);
Size frameSize = glview->getFrameSize();
// frameSize가 smallResource보다 작거나 같으면 smallResource를 사용한다.
std::vector<std::string> resDirOrders;
if (frameSize.height <= smallResource.size.height){
resDirOrders.push_back(smallResource.directory);
director->setContentScaleFactor(smallResource.size.height / designResolutionSize.height);
}
// frameSize가 smallResource보다 크면 같으면 mediumResource를 사용한다.
else{
resDirOrders.push_back(mediumResource.directory);
director->setContentScaleFactor(mediumResource.size.height / designResolutionSize.height);
}
FileUtils::getInstance()->setSearchResolutionsOrder(resDirOrders);
// turn on display FPS
director->setDisplayStats(true);
// set FPS. the default value is 1.0/60 if you don't call this
director->setAnimationInterval(1.0 / 60);
// create a scene. it's an autorelease object
auto scene = StartScene::createScene();
// run
director->runWithScene(scene);
return true;
}
HelloWorld 클래스를 StartScene으로 수정합니다.
디버거를 실행합니다.
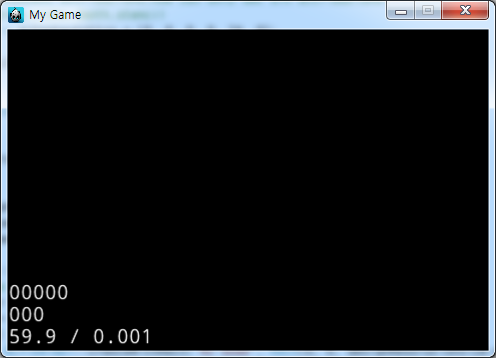
Figure 15 실행화면
검은 화면이 나오면 StartScene이 호출된 것 입니다.
배경이미지를 추가할 것인데 배경이미지를 시작화면과 스테이지 선택화면, 게임화면에서 모두 같은 배경을 사용하도록 할 것입니다. 따라서 따로 클래스를 생성해 추가하도록 할 것 입니다.
이렇게 만들면 하나의 클래스파일을 이용하여 여러 Scene에서 한번에 사용할 수 있습니다.
BackgroundLayer라는 이름의 클래스를 Classes 폴더에 생성합니다. [5.2] 참고.
Figure 16 클래스 추가
BackgroundLayer.h 파일과 BackgroundLayer.cpp 파일을 생성하였으면 아래와 같이 수정합니다.
---------BackgroundLayer.h----------
#include "cocos2d.h"
USING_NS_CC;
class BackgroundLayer :public Layer
{
public:
static BackgroundLayer * create();
bool init();
};
---------BackgroundLayer.cpp----------
#include "BackgroundLayer.h"
BackgroundLayer * BackgroundLayer::create(){
BackgroundLayer *pRet = new BackgroundLayer();
if (pRet && pRet->init())
{
pRet->autorelease();
}
else
{
CC_SAFE_DELETE(pRet);
}
return pRet;
}
bool BackgroundLayer::init(){
auto bg = Sprite::create("main_bg.png");
bg->setAnchorPoint(Point::ZERO);
this->addChild(bg);
return true;
}
BackgroundLayer 클래스를 생성했고 BackgroundLayer 클래스에는 Sprite를 배경으로 하나 추가하였습니다.
BackgroundLayer 클래스를 StartScene에서 호출 하도록 하겠습니다.
----------StartScene.cpp----------
#include "StartScene.h"
#include "BackgroundLayer.h"
USING_NS_CC;
…생략…
// on "init" you need to initialize your instance
bool StartScene::init()
{
//////////////////////////////
// 1. super init first
if (!Layer::init())
{
return false;
}
//code here
this->addChild(BackgroundLayer::create());
return true;
}
StartScene에 BackgroundLayer 클래스를 추가하였습니다. 디버거를 실행해 확인해봅니다.
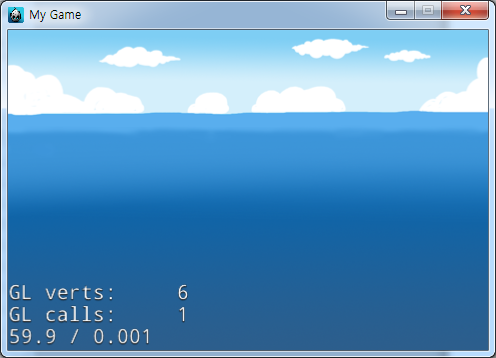
Figure 17 실행화면
배경이 추가되었습니다.
배경을 추가했고, 이번엔 타이틀을 추가하도록 하겠습니다.
----------StartScene.cpp----------
…생략…
// on "init" you need to initialize your instance
bool StartScene::init()
{
//////////////////////////////
// 1. super init first
if (!Layer::init())
{
return false;
}
//code here
//Device의 크기를 가져옵니다.
auto winSize = Director::getInstance()->getOpenGLView()->getDesignResolutionSize();
this->addChild(BackgroundLayer::create());
auto title = Sprite::create("title_1.png");
title->setPosition(Point(winSize.width / 2, 230));
this->addChild(title);
return true;
}
Sprite를 이용해 타이틀이미지를 생성해 위치 시켰습니다.
디버거를 실행해 확인합니다.
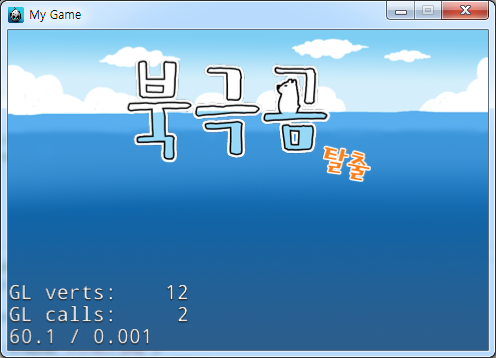
Figure 18 실행화면
타이틀이 추가되었습니다.
우측 하단에 배경을 꾸미는 이미지를 추가하도록 하겠습니다.
----------StartScene.cpp----------
…생략…
// on "init" you need to initialize your instance
bool StartScene::init()
{
//////////////////////////////
// 1. super init first
if (!Layer::init())
{
return false;
}
//code here
//Device의 크기를 가져옵니다.
auto winSize = Director::getInstance()->getOpenGLView()->getDesignResolutionSize();
this->addChild(BackgroundLayer::create());
auto title = Sprite::create("title_1.png");
title->setPosition(Point(winSize.width / 2, 230));
this->addChild(title);
auto deco = Sprite::create("intro_bear1.png");
deco->setAnchorPoint(Point(1, 0));
deco->setPosition(Point(winSize.width, 0));
this->addChild(deco);
return true;
}
디버거를 실행해 이미지가 정확하게 위치됐는지 확인합니다.
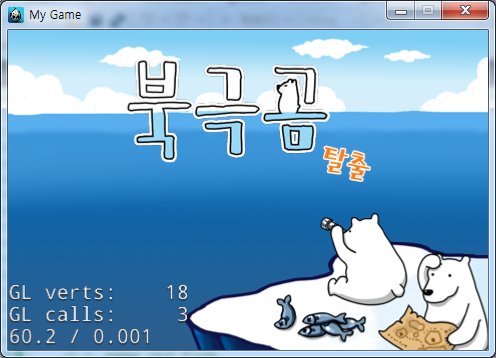
Figure 19 실행화면
우측 하단에 이미지가 추가되었습니다.
다음은 메뉴 버튼을 추가하도록 하겠습니다.
버튼에 대한 콜백함수 등록까지 진행하도록 하겠습니다.
----------StartScene.h----------
#include "cocos2d.h"
class StartScene : public cocos2d::Layer
{
public:
// there's no 'id' in cpp, so we recommend returning the class instance pointer
static cocos2d::Scene* createScene();
// Here's a difference. Method 'init' in cocos2d-x returns bool, instead of returning 'id' in cocos2d-iphone
virtual bool init();
// implement the "static create()" method manually
CREATE_FUNC(StartScene);
void onClickGame(Ref *object);
void onClickRank(Ref *object);
};
----------StartScene.cpp----------
…생략…
// on "init" you need to initialize your instance
bool StartScene::init()
{
//////////////////////////////
// 1. super init first
if (!Layer::init())
{
return false;
}
//code here
//Device의 크기를 가져옵니다.
auto winSize = Director::getInstance()->getOpenGLView()->getDesignResolutionSize();
this->addChild(BackgroundLayer::create());
auto title = Sprite::create("title_1.png");
title->setPosition(Point(winSize.width / 2, 230));
this->addChild(title);
auto deco = Sprite::create("intro_bear1.png");
deco->setAnchorPoint(Point(1, 0));
deco->setPosition(Point(winSize.width, 0));
this->addChild(deco);
auto gameMenu = MenuItemImage::create("btn_play.png", "btn_play_on.png", CC_CALLBACK_1(StartScene::onClickGame, this));
gameMenu->setPosition(Point(winSize.width / 2, 130));
auto rankMenu = MenuItemImage::create("btn_ranking.png", "btn_ranking_on.png", CC_CALLBACK_1(StartScene::onClickRank, this));
rankMenu->setPosition(Point(winSize.width / 2, 70));
auto menu = Menu::create(gameMenu, rankMenu, NULL);
menu->setPosition(Point::ZERO);
this->addChild(menu);
return true;
}
void StartScene::onClickGame(Ref *object){
log("onClickGame");
}
void StartScene::onClickRank(Ref *object){
log("onClickRank");
}
디버거를 실행해 버튼을 눌러 확인해보도록 합니다.
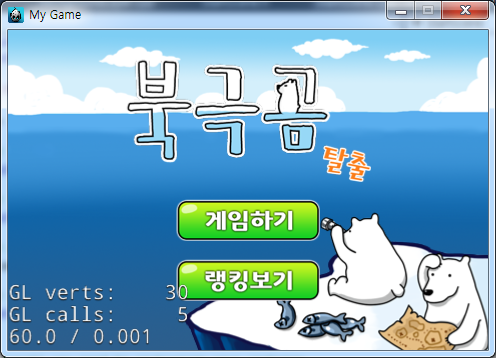
Figure 20 실행화면
버튼이 2개 위치된 것을 확인할 수 있습니다.
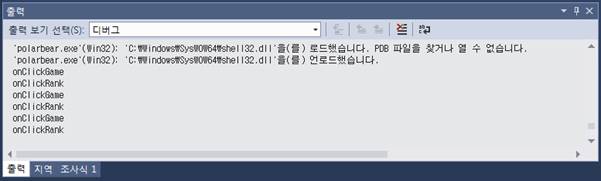
Figure 21 버튼 선택시 로그 확인
버튼이 눌렸을 때 이미지가 변경되고 로그가 제대로 나오는 것을 확인할 수 있습니다.
8.4.2. 시작화면에 애니메이션 구현하기
밋밋한 화면에 움직임을 추가해보도록 하겠습니다.
먼저 타이틀에 에니메이션을 추가하도록 하겠습니다.
----------StartScene.cpp----------
…생략…
// on "init" you need to initialize your instance
bool StartScene::init()
{
//////////////////////////////
// 1. super init first
if (!Layer::init())
{
return false;
}
//code here
//Device의 크기를 가져옵니다.
auto winSize = Director::getInstance()->getOpenGLView()->getDesignResolutionSize();
this->addChild(BackgroundLayer::create());
auto title = Sprite::create("title_1.png");
title->setPosition(Point(winSize.width / 2, 230));
this->addChild(title);
auto action1 = Sequence::createWithTwoActions(RotateTo::create(0.05f, -1), RotateTo::create(0.05f, 1));
title->runAction(RepeatForever::create(action1));
auto deco = Sprite::create("intro_bear1.png");
deco->setAnchorPoint(Point(1, 0));
deco->setPosition(Point(winSize.width, 0));
this->addChild(deco);
…생략…
0.05초동안 -1도로 이동시키고 0.05초동안 1초로 이동하였습니다. 이 에니메이션을 RepeatForever를 이용하여 영원히 반복하도록 하였습니다.
짧은시간동안 작은 각도를 움직여 덜덜 떠는 느낌을 주었습니다.
디버거를 실행해 확인해보도록 합니다.
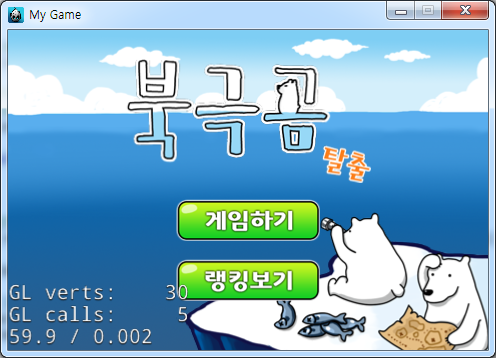
Figure 22 실행화면
타이틀에 에니메이션이 추가되었습니다.
다음으로 우측 하단의 이미지에 에니메이션을 추가하도록 하겠습니다.
----------StartScene.cpp----------
...생략…
// on "init" you need to initialize your instance
bool StartScene::init()
{
//////////////////////////////
// 1. super init first
if (!Layer::init())
{
return false;
}
//code here
//Device의 크기를 가져옵니다.
auto winSize = Director::getInstance()->getOpenGLView()->getDesignResolutionSize();
this->addChild(BackgroundLayer::create());
auto title = Sprite::create("title_1.png");
title->setPosition(Point(winSize.width / 2, 230));
this->addChild(title);
auto action1 = Sequence::createWithTwoActions(RotateTo::create(0.05f, -1), RotateTo::create(0.05f, 1));
title->runAction(RepeatForever::create(action1));
auto deco = Sprite::create("intro_bear1.png");
deco->setAnchorPoint(Point(0, 1));
deco->setPosition(Point(winSize.width, 0));
this->addChild(deco);
deco->runAction(MoveBy::create(0.5f, Point(-deco->getContentSize().width, deco->getContentSize().height)));
...생략…
AnchorPoint를 변경하여 deco의 이미지 초기 위치를 화면 밖으로 수정하고 화면안으로 들어오는 에니메이션을 추가하였습니다.
에니메이션을 적용하는데 MoveBy와 MoveTo가 있습니다.
By는 해당 Node의 현재위치에 상대값만큼 적용되는 것이고, To는 해당위치로 절대값만큼 적용되는 것입니다.
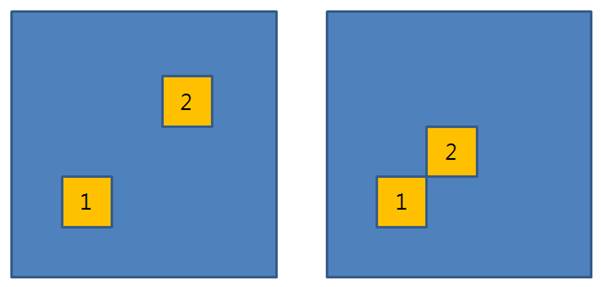
Figure 23 MoveBy / MoveTo의 이동
예를들어 Node가 (50, 50)에 위치하고 있을 때 MoveBy를 이용해 (100, 100)만큼 적용하면 Node는 (150, 150)으로 이동하는 에니메이션이 적용되고(위 그림의 좌측) MoveTo를 이용해 (100, 100)만큼 적용하면 Node는 (100, 100)으로 이동하게 됩니다.(위 그림의 우측)
디버거를 실행하여 에니메이션의 동작을 확인합니다.
Figure 24 실행화면
에니메이션을 좀더 어색하지 않게 가속도를 추가하도록 하겠습니다.
----------StartScene.cpp----------
…생략…
// on "init" you need to initialize your instance
bool StartScene::init()
{
//////////////////////////////
// 1. super init first
if (!Layer::init())
{
return false;
}
//code here
//Device의 크기를 가져옵니다.
auto winSize = Director::getInstance()->getOpenGLView()->getDesignResolutionSize();
this->addChild(BackgroundLayer::create());
auto title = Sprite::create("title_1.png");
title->setPosition(Point(winSize.width / 2, 230));
this->addChild(title);
auto action1 = Sequence::createWithTwoActions(RotateTo::create(0.05f, -1), RotateTo::create(0.05f, 1));
title->runAction(RepeatForever::create(action1));
auto deco = Sprite::create("intro_bear1.png");
deco->setAnchorPoint(Point(0, 1));
deco->setPosition(Point(winSize.width, 0));
this->addChild(deco);
auto easeAction = EaseInOut::create(MoveBy::create(0.5f, Point(-deco->getContentSize().width, deco->getContentSize().height)), 1);
deco->runAction(easeAction);
…생략…
EaseInOut을 사용하여 가속도를 추가했습니다. EaseInOut의 create()의 두번째 파라메터는 탄성 값입니다. 이 탄성값을 수정하면 가속도의 변화 폭을 수정할 수 있습니다.
디버거를 실행해 에니메이션을 확인하도록 합니다.
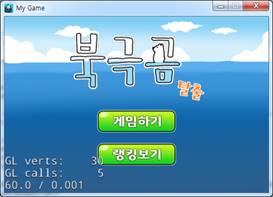
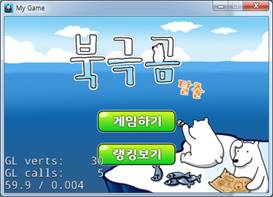
Figure 25 실행화면
우측 하단에서 이미지가 나오는 것을 확인할 수 있습니다.
8.4.3. 배경 이미지에 에니메이션 추가하기(ParallaxNode)
앞에서 만든 BackgroundLayer 클래스에 여러가지 이미지와 에니메이션을 추가해 동적인 배경을 만들어보도록 하겠습니다.
먼저 빙하 이미지와 구름 이미지를 3개를 이용하여 원근감있는 움직임을 추가해보도록 하겠습니다.
----------BackgroundLayer.cpp----------
…생략…
bool BackgroundLayer::init(){
auto bg = Sprite::create("main_bg.png");
bg->setAnchorPoint(Point::ZERO);
this->addChild(bg);
//배경 스프라이트1
auto background1 = Sprite::create("bg_ice1.png");
background1->setAnchorPoint(Point(0, 0));
auto background2 = Sprite::create("bg_ice2.png");
background2->setAnchorPoint(Point(0, 0));
auto background3 = Sprite::create("cloud_bg.png");
background3->setAnchorPoint(Point(0, 0));
//패럴랙스노드를 만든다.
auto parallaxNode = ParallaxNode::create();
//배경 스트라이트를 패럴랙스노드에 넣는다.
parallaxNode->addChild(background1, 1, Point(0.5f, 0.0f), Point(0, 225));
parallaxNode->addChild(background2, 1, Point(0.75f, 0.0f), Point(0, 218));
parallaxNode->addChild(background3, 1, Point(1.0f, 0.0f), Point(0, 230));
this->addChild(parallaxNode);
return true;
}
ParallaxNode에 빙하이미지 2개와 구름이미지 1개를 생성하여 추가해주었습니다.
ParallaxNode에 자식노드를 추가할 때 3번째 파라메터는 비율, 4번째 파라메터는 offSet을 추가합니다.
비율에 적용된 값에 따라 에니메이션적용 비율이 달라집니다.
ParallaxNode는 자식노드들에 가중을 적용하여 해당 노드들에 에니메이션을 가중에 따라 적용할 수 있습니다. 예를들어 차를 타고 이동한다고 하면 가까운곳의 나무는 빠르게 뒤로 지나가지만 먼곳의 나무는 천천히 지나갑니다. 이런식의 구성을 구현하기에 용이한 클래스입니다.
디버거를 실행합니다.
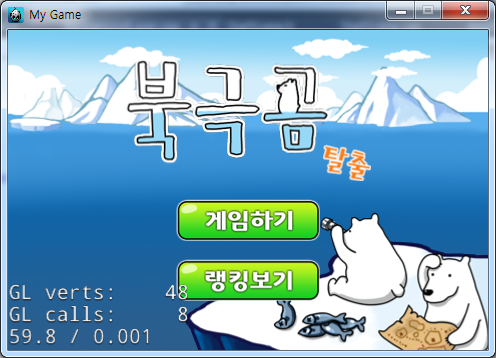
Figure 26 실행화면
배경에 빙하와 구름이 추가되었습니다.
이 이미지에 이제 에니메이션을 추가하도록 하겠습니다.
----------BackgroundLayer.cpp----------
…생략…
bool BackgroundLayer::init(){
auto bg = Sprite::create("main_bg.png");
bg->setAnchorPoint(Point::ZERO);
this->addChild(bg);
//배경 스프라이트1
auto background1 = Sprite::create("bg_ice1.png");
background1->setAnchorPoint(Point(0, 0));
auto background2 = Sprite::create("bg_ice2.png");
background2->setAnchorPoint(Point(0, 0));
auto background3 = Sprite::create("cloud_bg.png");
background3->setAnchorPoint(Point(0, 0));
//패럴랙스노드를 만든다.
auto parallaxNode = ParallaxNode::create();
//배경 스트라이트를 패럴랙스노드에 넣는다.
parallaxNode->addChild(background1, 1, Point(0.5f, 0.0f), Point(0, 225));
parallaxNode->addChild(background2, 1, Point(0.75f, 0.0f), Point(0, 218));
parallaxNode->addChild(background3, 1, Point(1.0f, 0.0f), Point(0, 230));
this->addChild(parallaxNode);
auto go = MoveBy::create(60, Point(-1024 + 320, 0));
auto go2 = MoveBy::create(60, Point(1024 - 320, 0));
auto action1 = Sequence::create(go, go2, NULL);
auto action2 = RepeatForever::create(action1);
parallaxNode->runAction(action2);
return true;
}
MoveBy 에니메이션을 ParallaxNode에 추가하여 반복시켰습니다.
좌측으로 60초동안 이동한뒤 우측으로 60초동안 이동합니다.
ParallaxNode에 에니메이션을 적용할 경우 자식 노드들은 ParallaxNode에 추가될 때 파라메터의 비율에 따라 에니메이션이 적용됩니다.
디버거를 실행해 확인해보도록 합니다.
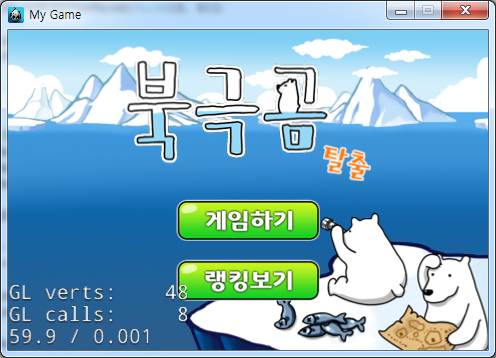
Figure 27 실행화면
빙하와 구름이 이동되는 것을 확인할 수 있습니다.
같은속도로 이동되는 것이 아니라 비율에 따라 서로 다른속도로 에니메이션이 적용되었습니다.
바다에 고래의 꼬리와 거품을 스프라이트 에니메이션이용하고 동적으로 추가해 보도록 하겠습니다.
----------BackgroundLayer.h----------
#include "cocos2d.h"
USING_NS_CC;
class BackgroundLayer :public Layer
{
public:
static BackgroundLayer * create();
bool init();
void callWhale();
void callWave();
void removeMe(Node *node);
};
----------BackgroundLayer.cpp----------
…생략…
auto go = MoveBy::create(60, Point(-1024 + 320, 0));
auto go2 = MoveBy::create(60, Point(1024 - 320, 0));
auto action1 = Sequence::create(go, go2, NULL);
auto action2 = RepeatForever::create(action1);
parallaxNode->runAction(action2);
callWhale();
callWave();
return true;
}
void BackgroundLayer::callWhale(){
//고래 꼬리 에니메이션 추가
auto texture = TextureCache::getInstance()->addImage("whale.png");
//whale.png의 프레임수
int frameCnt = 6;
float textureWidth = texture->getContentSize().width / frameCnt;
float textureHeight = texture->getContentSize().height;
SpriteFrame *frame[6];
//texture에서 각 이미지를 프레임별로 받아옴
frame[0] = SpriteFrame::createWithTexture(texture, Rect(0, 0, textureWidth, textureHeight));
frame[1] = SpriteFrame::createWithTexture(texture, Rect(textureWidth * 1, 0, textureWidth, textureHeight));
frame[2] = SpriteFrame::createWithTexture(texture, Rect(textureWidth * 2, 0, textureWidth, textureHeight));
frame[3] = SpriteFrame::createWithTexture(texture, Rect(textureWidth * 3, 0, textureWidth, textureHeight));
frame[4] = SpriteFrame::createWithTexture(texture, Rect(textureWidth * 4, 0, textureWidth, textureHeight));
frame[5] = SpriteFrame::createWithTexture(texture, Rect(textureWidth * 5, 0, textureWidth, textureHeight));
//받아온 프레임을 Vector에 추가
Vector<SpriteFrame*> AniFrames;
AniFrames.pushBack(frame[0]);
AniFrames.pushBack(frame[1]);
AniFrames.pushBack(frame[2]);
AniFrames.pushBack(frame[3]);
AniFrames.pushBack(frame[4]);
AniFrames.pushBack(frame[5]);
//받아온 프레임으로 에니메이션을 생성한다.
auto animation = Animation::createWithSpriteFrames(AniFrames);
//프레임당 속도
animation->setDelayPerUnit(0.4f);
auto animate = Animate::create(animation);
//첫번째 프레임으로 초기이미지 생성
auto firstFrame = Sprite::createWithSpriteFrame(frame[0]);
// 위치는 정해진 위치에서 랜덤하게 위치시킵니다.
Point randPoint = Point(480 * CCRANDOM_0_1(), 200 * CCRANDOM_0_1());
firstFrame->setPosition(randPoint);
this->addChild(firstFrame);
//스프라이트에 에니메이션 추가한다. 에니메이션이 실행되고 removeMe()를 호출합니다.
firstFrame->runAction(RepeatForever::create(Sequence::createWithTwoActions(animate, CallFuncN::create(CC_CALLBACK_1(BackgroundLayer::removeMe, this)))));
//0~5초 동안 기다리고 CallWhale()을 호출합니다.
this->runAction(Sequence::createWithTwoActions(DelayTime::create(5 * CCRANDOM_0_1()), CallFunc::create(CC_CALLBACK_0(BackgroundLayer::callWhale, this))));
}
void BackgroundLayer::callWave(){
//파도 에니메이션 추가
auto texture = TextureCache::getInstance()->addImage("wave.png");
//wave.png의 프레임수
int frameCnt = 6;
float textureWidth = texture->getContentSize().width / frameCnt;
float textureHeight = texture->getContentSize().height;
SpriteFrame *frame[6];
Vector<SpriteFrame*> AniFrames;
for (int i = 0; i < frameCnt; i++){
frame[i] = SpriteFrame::createWithTexture(texture, Rect(textureWidth * i, 0, textureWidth, textureHeight));
AniFrames.pushBack(frame[i]);
}
//받아온 프레임으로 에니메이션을 생성한다.
auto animation = Animation::createWithSpriteFrames(AniFrames);
//프레임당 속도
animation->setDelayPerUnit(0.4f);
auto animate = Animate::create(animation);
//첫번째 프레임으로 초기이미지 생성
auto firstFrame = Sprite::createWithSpriteFrame(frame[0]);
// 위치는 정해진 위치에서 랜덤하게 위치시킵니다.
Point randPoint = Point(480 * CCRANDOM_0_1(), 200 * CCRANDOM_0_1());
firstFrame->setPosition(randPoint);
this->addChild(firstFrame);
//스프라이트에 에니메이션 추가한다. 에니메이션이 실행되고 removeMe()를 호출합니다.
firstFrame->runAction(RepeatForever::create(Sequence::createWithTwoActions(animate, CallFuncN::create(CC_CALLBACK_1(BackgroundLayer::removeMe, this)))));
//0~3초 동안 기다리고 CallWave()을 호출합니다.
this->runAction(Sequence::createWithTwoActions(DelayTime::create(3 * CCRANDOM_0_1()), CallFunc::create(CC_CALLBACK_0(BackgroundLayer::callWave, this))));
}
void BackgroundLayer::removeMe(Node *node){
//부모로 부터 자신을 없앤다.
node->removeFromParentAndCleanup(true);
}
callWhale()과 callWave(), removeMe() 메소드를 생성 하였습니다.
callWhale()메소드와 callWave()메소드는 이미지를 불러오는 부분의 이미지파일명과, 자기자신을 호출하는 부분에서 기다리는 시간만 제외하고 같은 형식으로 되어있습니다.

Figure 28 스프라이트 이미지
whale.png파일을 보면 하나의 파일에 여러장의 이미지가 들어가있습니다. 이렇게 하나의 파일에 에니메이션 프레임이 들어있을때의 사용법은 texture에 담아 위치값을 이용하여 각 프레임을 가져옵니다.
위치는 랜덤함수인 CCRANDOM_0_1()을 이용했습니다. CCRANDOM_0_1()는 0~1 사이의 값을 랜덤하게 생성합니다. 이미지를 위치시키는데 이 CCRANDOM_0_1()를 이용하면 동적인 위치를 가져올 수 있습니다.
에니메이션이 종료되면 자기자신을 제거하고 랜덤한 시간동안 기다린뒤 다시 메소드를 호출합니다.
CallFunc와 CallFuncN의 차이점은 CC_CALLBACK_0과 CC_CALLBACK_1의 차이점이 있습니다.
CallFunc는 자신 노드를 보내지 않기에 CC_CALLBACK_0을 이용하고 CallFuncN은 자신 노드를 파라메터로 보내기에 CC_CALLBACK_1을 사용합니다.
디버거를 실행해 고래 꼬리와 파도가 나오는지 확인해보도록 합니다.
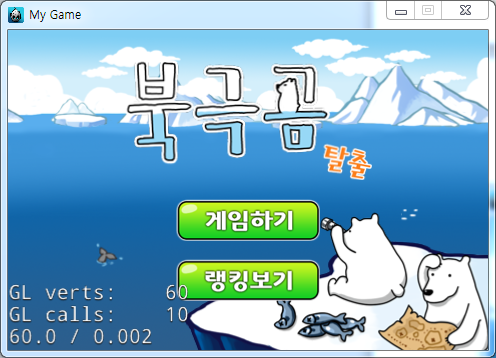
Figure 29 실행화면
여기저기에 고래꼬리와 파도 거품이미지가 나타났다 사라집니다.
8.4.4. 게임하기 버튼 Event 구현
게임하기 버튼을 선택하면 스테이지 선택화면으로 이동하도록 합니다.
먼저 스테이지 선택화면을 생성하기 위해 StageScene이라는 이름의 클래스를 Classes 폴더에 생성합니다. [5.2] 참고.
Figure 30 클래스 생성
StageScene.h 파일과 StageScene.cpp 파일을 생성하였으면 아래와 같이 수정합니다.
----------StageScene.h----------
#include "cocos2d.h"
class StageScene : public cocos2d::Layer
{
public:
// there's no 'id' in cpp, so we recommend returning the class instance pointer
static cocos2d::Scene* createScene();
// Here's a difference. Method 'init' in cocos2d-x returns bool, instead of returning 'id' in cocos2d-iphone
virtual bool init();
// implement the "static create()" method manually
CREATE_FUNC(StageScene);
};
----------StageScene.cpp----------
#include "StageScene.h"
#include "BackgroundLayer.h"
USING_NS_CC;
Scene* StageScene::createScene()
{
// 'scene' is an autorelease object
auto scene = Scene::create();
// 'layer' is an autorelease object
auto layer = StageScene::create();
// add layer as a child to scene
scene->addChild(layer);
// return the scene
return scene;
}
// on "init" you need to initialize your instance
bool StageScene::init()
{
//////////////////////////////
// 1. super init first
if (!Layer::init())
{
return false;
}
//code here
this->addChild(BackgroundLayer::create());
return true;
}
StageScene 클래스를 수정하였으면 StageScene을 호출하도록 수정하겠습니다.
----------StartScene.cpp----------
#include "StartScene.h"
#include "BackgroundLayer.h"
#include "StageScene.h"
USING_NS_CC;
…생략…
void StartScene::onClickGame(Ref *object){
log("onClickGame");
auto Scene = TransitionCrossFade::create(0.5f, StageScene::createScene());
Director::getInstance()->pushScene(Scene);
}
StartScene의 onClickGame()에서 StageScene을 호출하도록 합니다.
디버거를 실행하여 화면이 이동되는지 확인하도록 합니다.
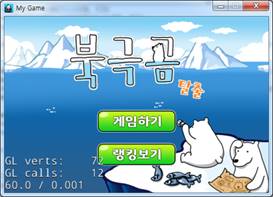
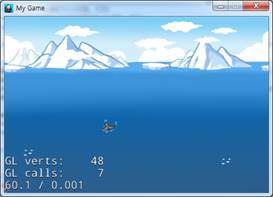
Figure 31 실행화면
StageScene에는 배경만 추가되어있습니다. 기존에 만들어둔 배경이 똑같이 나오는 것을 볼 수 있습니다.
8.4.5. 랭킹보기 버튼 Event 구현
랭킹보기 버튼을 누르면 팝업이 나오도록 구현할 것 입니다.
RankingPopup이라는 이름의 Class를 Classes 폴더에 생성합니다. [5.2] 참고.
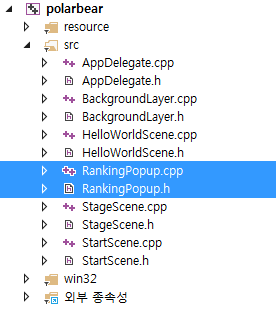
Figure 32 클래스 생성
RankingPopup.h 파일과 RankingPopup.cpp 파일을 생성하였으면 아래와 같이 수정합니다.
----------RankingPopup.h----------
#include "cocos2d.h"
USING_NS_CC;
class RankingPopup :public Layer
{
public:
static RankingPopup * create();
bool init();
virtual void onEnter();
bool onTouchBegan(Touch* touch, Event* event);
void onClickOk(Ref *object);
};
----------RankingPopup.cpp----------
#include "RankingPopup.h"
RankingPopup * RankingPopup::create(){
RankingPopup *ret = new RankingPopup();
if (ret && ret->init())
{
ret->autorelease();
}
else
{
CC_SAFE_DELETE(ret);
}
return ret;
}
bool RankingPopup::init(){
//여기에 팝업을 작성한다.
//Device의 크기를 가져옵니다.
auto winSize = Director::getInstance()->getOpenGLView()->getDesignResolutionSize();
auto fadeBack = LayerColor::create(Color4B(0, 0, 0, 0), winSize.width, winSize.height);
this->addChild(fadeBack);
fadeBack->runAction(FadeTo::create(0.5f, 200));
auto back = Sprite::create("pop_rank.png");
back->setPosition(Point(winSize.width / 2, winSize.height / 2));
this->addChild(back);
auto okMenu = MenuItemImage::create("btn_ok.png", "btn_ok_on.png", CC_CALLBACK_1(RankingPopup::onClickOk, this));
okMenu->setPosition(Point(back->getContentSize().width / 2, 10));
auto menu = Menu::create(okMenu, NULL);
menu->setPosition(Point::ZERO);
back->addChild(menu);
return true;
}
void RankingPopup::onEnter(){
Layer::onEnter();
setTouchEnabled(true);
setTouchMode(Touch::DispatchMode::ONE_BY_ONE);
}
bool RankingPopup::onTouchBegan(Touch* touch, Event* event){
return true;
}
void RankingPopup::onClickOk(Ref *object){
this->removeFromParentAndCleanup(true);
}
RankingPopup 클래스를 생성하였습니다. RankingPopup에 터치를 사용하여 우선순위를 높여 아래 부분이 눌리지 않도록 하였습니다. 터치우선순위는 확인 버튼이 가장높고 그다음 RankingPopup이 높습니다.
따라서 StartScene의 버튼들은 눌리지 않습니다.
StartScene에서 RankingPopup을 호출하도록 수정하겠습니다.
----------StartScene.cpp-----------
#include "StartScene.h"
#include "BackgroundLayer.h"
#include "StageScene.h"
#include "RankingPopup.h"
USING_NS_CC;
…생략…
void StartScene::onClickRank(Ref *object){
log("onClickRank");
this->addChild(RankingPopup::create(), 99);
}
StartScene에서 RankingPopup을 zOrder를 99로 추가하였습니다.
디버거를 실행해 팝업이 나오는지 확인해보도록 합니다.
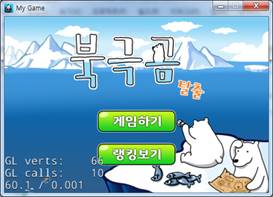
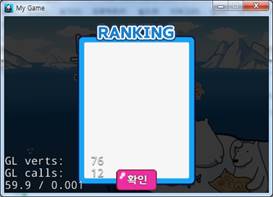
Figure 33 실행화면
팝업이 출력되고 뒷부분의 버튼은 눌리지 않지만 확인버튼은 눌리는 것을 확인할 수 있습니다.
확인 버튼이 눌리면 RankingPopup을 제거합니다.