6 캐릭터 생성, 저장, 조회 구현하기
지난번 연재 6-1, 6-2, 6-3, 6-4, 6-5와 이어집니다.
6.3 캐릭터 조회(갤러리) 구현하기
6.3.1 갤러리 레이어 구현하기
먼저 갤러리의 화면을 구성할 기본이 되는 Layer를 추가하겠습니다.
----------GalleryScene.cpp----------
…생략…
// on "init" you need to initialize your instance
bool GalleryScene::init()
{
…생략…
auto menu2 = Menu::create(home, make, NULL);
menu2->setPosition(Point::ZERO);
this->addChild(menu2);
auto galleryLayer = LayerColor::create(Color4B(255, 0, 0, 255), winSize.width, 422);
//LayerColor는 기본 AnchorPoint가 (0, 0)이다.
galleryLayer->setPosition(Point(0, 48));
//tag를 1로지정해주었다.
this->addChild(galleryLayer, 0, 1);
return true;
}
LayerColor를 이용해 색상을 추가하여 눈으로 볼 수 있도록 하였습니다.
디버거을 실행하여 확인합니다.
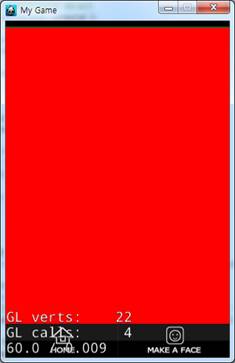
Figure 6‑65 실행화면
붉은 색으로 Gallery를 구성할 Item들이 들어갈 영역이 생성되었습니다.
이 붉은 영역안에 저장한 이미지들이 보이도록 할 것 입니다.
그럼 아이템을 구성할 Class를 생성하겠습니다.
----------GalleryScene.h----------
#include "cocos2d.h"
class GalleryScene : public cocos2d::Layer
{
public:
// there's no 'id' in cpp, so we recommend returning the class instance pointer
static cocos2d::Scene* createScene();
// Here's a difference. Method 'init' in cocos2d-x returns bool, instead of returning 'id' in cocos2d-iphone
virtual bool init();
// implement the "static create()" method manually
CREATE_FUNC(GalleryScene);
void onClickHome(Ref *object);
void onClickMake(Ref *object);
//아이템들을 추가할 메서드
void setItems();
//아이템의 이미지를 번호와 색상에 맞추어 가져옴, CharacterScene의 setImage()와 비슷하게 동작하나 Sprite를 return하도록 구현
cocos2d::Sprite* getImage(std::string tableName, int rowNo, int colorNo);
void onClickItemCallback(Ref *object);
int _removeNo;
void removeItem();
};
----------GalleryScene.cpp----------
…생략…
// on "init" you need to initialize your instance
bool GalleryScene::init()
{
…생략…
auto galleryLayer = LayerColor::create(Color4B(255, 0, 0, 255), winSize.width, 422);
//LayerColor는 기본 AnchorPoint가 (0, 0)이다.
galleryLayer->setPosition(Point(0, 48));
//tag를 1로지정해주었다.
this->addChild(galleryLayer, 0, 1);
setItems();
return true;
}
…생략…
void GalleryScene::setItems(){
}
Sprite* GalleryScene::getImage(std::string tableName, int rowNo, int colorNo){
return NULL;
}
void GalleryScene::onClickItemCallback(Ref *object){
auto MenuItem = (MenuItemSprite *)object;
log("tag : %d", MenuItem->getTag());
}
void GalleryScene::removeItem(){
}
setItems()와 getImage(), onClickItemCallback(), removeItem()을 추가하였습니다.
setItems()에서 getImage()를 호출하여 하나하나의 Item의 이미지를 가져와 구성하도록 할 것 입니다.
galleryItem을 선택하면 onClickItemCallback()메서드가 실행되도록 구현할 것 입니다.
저장된 데이터베이스를 가져올 수 있도록 character 구조체에 no를 추가하고 메서드를 생성하겠습니다.
----------DatabaseManager.h----------
#ifndef __DATABASEMANAGER_H__
#define __DATABASEMANAGER_H__
#include "sqlite3.h"
#include "cocos2d.h"
//USING_NS_CC;와 같습니다.
using namespace cocos2d;
//std의 네임스페이스를 사용하겠다고 정의합니다.
using namespace std;
struct head
{
public:
int no;
char *image;
//Point에는 x와 y값이 들어갑니다.
Point position;
//Color3B에는 r, g, b값이 들어갑니다.
Color3B color1;
Color3B color2;
Color3B color3;
Color3B color4;
//색상 변경 관련 체크 변수
bool isColor;
};
struct character
{
public:
int no;
int headNo;
int headColorNo;
int hair1No;
int hair1ColorNo;
int hair2No;
int hair2ColorNo;
int eyeNo;
int eyeColorNo;
int mouthNo;
int mouthColorNo;
int etcNo;
int etcColorNo;
int bgNo;
int bgColorNo;
};
class DatabaseManager
{
private:
bool openDB();
void closeDB();
sqlite3 *_sqlite;
public:
DatabaseManager();
~DatabaseManager();
//에러메시지를 담을 변수
char *_errorMSG;
//결과의 상태를 담을 변수
int _result;
static DatabaseManager *getInstance();
void createDB();
void insertDB();
void selectDB();
list<head*> selectDB(string table, int no);
int insertCharacterDB(character *characterInfo);
void deleteCharacterDB(int no);
std::list<character*> selectGalleryDB();
};
#endif // __DATABASEMANAGER_H__
----------DatabaseManager.cpp----------
…생략…
list<character*> DatabaseManager::selectGalleryDB(){
list<character *> galleryItemList;
string query = "select * from TB_USER_CHARACTER";
sqlite3_stmt *pStmt = NULL;
_result = sqlite3_prepare_v2(_sqlite, query.c_str(), query.length(), &pStmt, NULL);
if (_result == SQLITE_OK)
{
log("selectDB() SUCCESS");
while (sqlite3_step(pStmt) == SQLITE_ROW)
{
character *item = new character;
item->no = sqlite3_column_int(pStmt, 0);
item->headNo = sqlite3_column_int(pStmt, 1);
item->headColorNo = sqlite3_column_int(pStmt, 2);
item->hair1No = sqlite3_column_int(pStmt, 3);
item->hair1ColorNo = sqlite3_column_int(pStmt, 4);
item->hair2No = sqlite3_column_int(pStmt, 5);
item->hair2ColorNo = sqlite3_column_int(pStmt, 6);
item->eyeNo = sqlite3_column_int(pStmt, 7);
item->eyeColorNo = sqlite3_column_int(pStmt, 8);
item->mouthNo = sqlite3_column_int(pStmt, 9);
item->mouthColorNo = sqlite3_column_int(pStmt, 10);
item->etcNo = sqlite3_column_int(pStmt, 11);
item->etcColorNo = sqlite3_column_int(pStmt, 12);
item->bgNo = sqlite3_column_int(pStmt, 13);
item->bgColorNo = sqlite3_column_int(pStmt, 14);
galleryItemList.push_back(item);
}
}
else{
log("ERROR CODE : %d", _result);
}
sqlite3_finalize(pStmt);
return galleryItemList;
}
저장된 row들을 list로 return 하는 메서드를 작성하였습니다.
그럼 이 메서드를 이용해 galleryItem을 구성하겠습니다.
----------GalleryScene.cpp----------
#include "GalleryScene.h"
#include "StartScene.h"
#include "DatabaseManager.h"
USING_NS_CC;
…생략…
void GalleryScene::setItems(){
//galleryLayer를 this에 tag가 1로 addchild 해주었다. getChildByTag는 해당 노드의 tag번호에 맞는 자식 노드를 반환한다.
auto galleryLayer = (LayerColor *)this->getChildByTag(1);
//removeAllChildrenWithCleanup()는 자식노드 전부를 삭제한다.
galleryLayer->removeAllChildrenWithCleanup(true);
std::list<character *>galleryList = DatabaseManager::getInstance()->selectGalleryDB();
int size = galleryList.size();
Vector<MenuItem*> itemArray;
for (int i = 1; i <= size; i++){
character *item = galleryList.front();
auto back = Sprite::create("s_bg_1.png");
auto head = getImage("TB_FACE", item->headNo, item->headColorNo);
auto hair1 = getImage("TB_HAIR1", item->hair1No, item->hair1ColorNo);
auto hair2 = getImage("TB_HAIR2", item->hair2No, item->hair2ColorNo);
auto eye = getImage("TB_EYE", item->eyeNo, item->eyeColorNo);
auto mouth = getImage("TB_MOUTH", item->mouthNo, item->mouthColorNo);
auto etc = getImage("TB_ETC", item->etcNo, item->etcNo);
auto bg = getImage("TB_BG", item->bgNo, item->bgColorNo);
//getImage()에서 setPosition이 되어있기에 따로 지정하지 않아도 된다.
back->addChild(bg, 0);
back->addChild(hair2, 1);
back->addChild(head, 2);
back->addChild(eye, 3);
back->addChild(mouth, 3);
back->addChild(hair1, 4);
back->addChild(etc, 5);
auto frame = Sprite::create("box_gallery.png");
frame->setPosition(Point(back->getContentSize().width / 2, back->getContentSize().height / 2));
back->addChild(frame, 6);
auto MenuItem = MenuItemSprite::create(back, NULL);
MenuItem->setTag(item->no); //삭제 기능을 위해 번호를 넣어준다.
//55px 로 크기를 줄이기 위해 scale을 구함
float scale = 55 / back->getContentSize().width;
MenuItem->setScale(scale);
int row = (i - 1) / 4; //0~3
int col = (i - 1) % 4; //0~3
//row와 col을 구한다.
MenuItem->setAnchorPoint(Point(0, 1));
//좌표를 동적할당
float x = col * MenuItem->getContentSize().width * scale + (col + 1) * 20;
float y = galleryLayer->getContentSize().height - (row * MenuItem->getContentSize().height * scale + (row + 1) * 15);
MenuItem->setPosition(Point(x, y));
itemArray.pushBack(MenuItem);
galleryList.pop_front();
}
auto menu = Menu::createWithArray(itemArray);
menu->setPosition(Point::ZERO);
galleryLayer->addChild(menu);
}
Sprite* GalleryScene::getImage(std::string tableName, int rowNo, int colorNo){
//매개변수에 맞춰 headList를 가져온다.
std::list<head *>headList = DatabaseManager::getInstance()->selectDB(tableName, rowNo);
//첫번째 구조체 가져오기
head * head = headList.front();
char smallImg[100];
sprintf(smallImg, "s_%s", head->image);
auto sprite = Sprite::create(smallImg);
if (head->isColor){
Color3B color;
switch (colorNo)
{
case 1:
color = head->color1;
break;
case 2:
color = head->color2;
break;
case 3:
color = head->color3;
break;
case 4:
color = head->color4;
break;
}
sprite->setColor(color);
}
//비율에 맞춰 위치를 조절해준다.
sprite->setPosition(Point(head->position.x *0.2f, head->position.y *0.2f));
return sprite;
}
DatabaseManager.h를 include한 뒤 데이터베이스에서 row들을 가져와 각각의 이미지를 getImage()를 이용해 Sprite로 가져와 크기를 줄여 galleryLayer에 위치시켰습니다.
이미지를 가져옴에 있어 s_ 라는 접두사가 붙은 작은 이미지를 불러왔습니다.
1/5 크기를 가진 이미지입니다.
따라서 좌표를 지정하는데 0.2를 곱하여 위치시켰습니다.
디버거를 실행하여 확인해보도록 합니다.
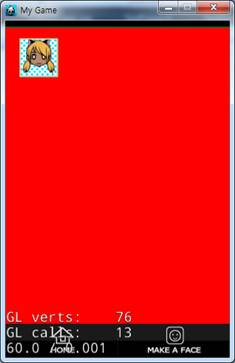
Figure 6‑66 실행화면
하나가 화면에 위치했습니다.
그러면 최대 개수인 20개 까지 저장해보고 확인해보겠습니다.
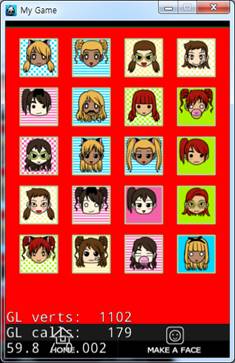
Figure 6‑67 실행화면
20개 모두 정상적으로 출력되는 것을 확인할 수 있습니다.
아이템을 선택하였을 때 이벤트와 기능을 구현해보도록 하겠습니다.
이부분도 이미 했던 부분이니 다시한번 확인해보도록합니다.
----------GalleryScene.cpp----------
#include "GalleryScene.h"
#include "StartScene.h"
#include "DatabaseManager.h"
#include "TextPopup.h"
USING_NS_CC;
…생략…
void GalleryScene::setItems(){
//galleryLayer를 this에 tag가 1로 addchild 해주었다. getChildByTag는 해당 노드의 tag번호에 맞는 자식 노드를 반환한다.
auto galleryLayer = (LayerColor *)this->getChildByTag(1);
//removeAllChildrenWithCleanup()는 자식노드 전부를 삭제한다.
galleryLayer->removeAllChildrenWithCleanup(true);
std::list<character *>galleryList = DatabaseManager::getInstance()->selectGalleryDB();
int size = galleryList.size();
Vector<MenuItem*> itemArray;
for (int i = 1; i <= size; i++){
character *item = galleryList.front();
auto back = Sprite::create("s_bg_1.png");
auto head = getImage("TB_FACE", item->headNo, item->headColorNo);
auto hair1 = getImage("TB_HAIR1", item->hair1No, item->hair1ColorNo);
auto hair2 = getImage("TB_HAIR2", item->hair2No, item->hair2ColorNo);
auto eye = getImage("TB_EYE", item->eyeNo, item->eyeColorNo);
auto mouth = getImage("TB_MOUTH", item->mouthNo, item->mouthColorNo);
auto etc = getImage("TB_ETC", item->etcNo, item->etcNo);
auto bg = getImage("TB_BG", item->bgNo, item->bgColorNo);
//getImage()에서 setPosition이 되어있기에 따로 지정하지 않아도 된다.
back->addChild(bg, 0);
back->addChild(hair2, 1);
back->addChild(head, 2);
back->addChild(eye, 3);
back->addChild(mouth, 3);
back->addChild(hair1, 4);
back->addChild(etc, 5);
auto frame = Sprite::create("box_gallery.png");
frame->setPosition(Point(back->getContentSize().width / 2, back->getContentSize().height / 2));
back->addChild(frame, 6);
auto MenuItem = MenuItemSprite::create(back, NULL, CC_CALLBACK_1(GalleryScene::onClickItemCallback, this));
MenuItem->setTag(item->no); //삭제 기능을 위해 번호를 넣어준다.
//55px 로 크기를 줄이기 위해 scale을 구함
float scale = 55 / back->getContentSize().width;
MenuItem->setScale(scale);
int row = (i - 1) / 4; //0~3
int col = (i - 1) % 4; //0~3
//row와 col을 구한다.
MenuItem->setAnchorPoint(Point(0, 1));
//좌표를 동적할당
float x = col * MenuItem->getContentSize().width * scale + (col + 1) * 20;
float y = galleryLayer->getContentSize().height - (row * MenuItem->getContentSize().height * scale + (row + 1) * 15);
MenuItem->setPosition(Point(x, y));
itemArray.pushBack(MenuItem);
galleryList.pop_front();
}
auto menu = Menu::createWithArray(itemArray);
menu->setPosition(Point::ZERO);
galleryLayer->addChild(menu);
}
…생략…
void GalleryScene::onClickItemCallback(Ref *object){
auto MenuItem = (MenuItemSprite *)object;
log("tag : %d", MenuItem->getTag());
_removeNo = MenuItem->getTag();
this->addChild(TextPopup::create("삭제하시겠습니까?", this, NULL, true), 10);
}
MenuItem에 onClickItemCallback()을 등록하고 onClickItemCallback()에서 _removeNo에 row번호를 추가한 뒤 팝업을 호출하였습니다.
디버거를 실행해서 MenuItem을 눌러봅니다.
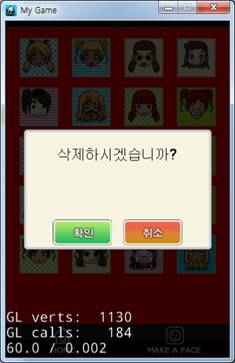
Figure 6‑68 실행화면
팝업이 제대로 출력됩니다.
하지만 확인을 눌러도 기능이 동작하지 않습니다. 확인을 누르면 기능이 동작하도록 해보겠습니다.
----------GalleryScene.cpp----------
..생략…
void GalleryScene::onClickItemCallback(Ref *object){
auto MenuItem = (MenuItemSprite *)object;
log("tag : %d", MenuItem->getTag());
_removeNo = MenuItem->getTag();
this->addChild(TextPopup::create("삭제하시겠습니까?", this, callfunc_selector(GalleryScene::removeItem), true), 10);
}
void GalleryScene::removeItem(){
DatabaseManager::getInstance()->deleteCharacterDB(_removeNo);
setItems();
}
TextPopup에 callback메서드를 등록한 뒤 deleteCharacterDB()를 _removeNo를 넘겨 호출해주어 데이터베이스에서 삭제합니다. TextPopup을 구현할때 콜백메서드가 있으면 콜백메서드를 호출해주도록 구현하였습니다.
setItems()는 galleryLayer의 child를 모두 삭제하고 데이터베이스에서 값을 불러오므로 다시 galleryItem들을 추가하게 됩니다.
디버거를 실행하여 기능이 동작하는지 확인해보도록 하겠습니다.
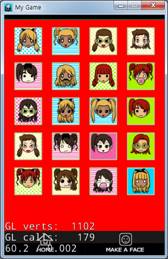
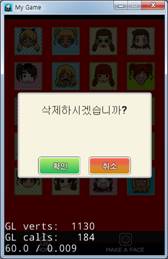
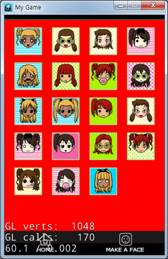
Figure 6‑69 실행화면
좌측 상단의 item을 삭제해보았습니다. 기능이 정상적으로 동작하는 것을 확인할 수 있습니다.
이제 레이어의 크기를 확인할 필요없으니 GalleryLayer의 색상을 없애도록 하겠습니다.
----------GalleryScene.cpp----------
…생략…
// on "init" you need to initialize your instance
bool GalleryScene::init()
{
//////////////////////////////
// 1. super init first
if (!Layer::init())
{
return false;
}
//code here
//Device의 크기를 가져옵니다.
Size winSize = Director::getInstance()->getOpenGLView()->getDesignResolutionSize();
//Sprite를 생성하여 이미지를 불러옵니다.
auto back = Sprite::create("bg_gallery.png");
//back를 해당 포인트에 위치시킵니다. 화면의 정중앙에 위치하도록 했습니다.
back->setPosition(Point(winSize.width / 2, winSize.height / 2));
//this에 back을 자식 노드로 추가하였습니다.
this->addChild(back);
auto home = MenuItemImage::create("menu_home2.png", "menu_home2_on.png", CC_CALLBACK_1(GalleryScene::onClickHome, this));
home->setAnchorPoint(Point(0, 0));
home->setPosition(Point(0, 0));
auto make = MenuItemImage::create("menu_make.png", "menu_make_on.png", CC_CALLBACK_1(GalleryScene::onClickMake, this));
make->setAnchorPoint(Point(1, 0));
make->setPosition(Point(winSize.width, 0));
auto menu2 = Menu::create(home, make, NULL);
menu2->setPosition(Point::ZERO);
this->addChild(menu2);
auto galleryLayer = LayerColor::create(Color4B(0, 0, 0, 0), winSize.width, 422);
//LayerColor는 기본 AnchorPoint가 (0, 0)이다.
galleryLayer->setPosition(Point(0, 48));
//tag를 1로지정해주었다.
this->addChild(galleryLayer, 0, 1);
setItems();
return true;
}
투명도를 0으로 수정하여 색상이 안나오도록 수정하였습니다.
디버거를 실행해 확인해봅니다.
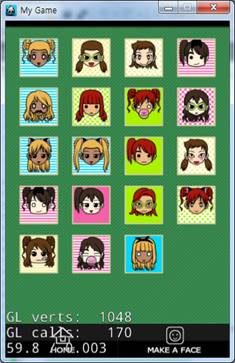
Figure 6‑70 실행화면
색상이 없어졌습니다.
이로써 갤러리 화면에 대한 기능구현도 끝이 났습니다.